Categories
Artificial Intelligence Machine Learning Power BI

Automated Machine Learning (AutoML) in Power BI

Automated Machine Learning (AutoML) in Power BI presentation by Hector Villafuerte at the SQL Saturday  – February South Florida 2020 and South Florida Code Camp in Davie.

AutoML was proposed as an artificial intelligence-based solution to the ever-growing challenge of applying machine learning. Business analysts can build Machine Learning models to solve business problems that once required data scientists. In this session, Hector will explain the principles of Machine Learning and AutoML (Automated machine learning) and he will demo AutoML PowerBI features end-to-end and show How to interpret and extract the optimum results based on specific business problems.


Categories
Artificial Intelligence Machine Learning Power BI

Artificial Intelligence (AI) for Business Intelligence

Artificial Intelligence (AI) for Business Intelligence presentation by Hector Villafuerte at the Power BI Fest – South Florida 2019.

This image has an empty alt attribute; its file name is image-2.png

Cognitive Services provides intelligent algorithms to see, hear, speak, understand and interpret user needs. Azure Machine Learning performs highly specialized tasks such as feature selection, algorithm selection or hyper-parameter optimization. Now with Auto ML in Power BI, business analysts can build ML models to solve business problems that once required high skilled data scientists. Hector will show and demo some original use cases with Cognitive Services, Azure Machine Learning and other new AI features recently available in PowerBI.

Event Date: November 16, 2019 8:00 am – 6:00 pm

Address:
Nova Southeastern University
Main Campus – Davie
3301 College Avenue
Davie, FL 33314

Categories
Power BI Uncategorized

Power BI for the Enterprise

Power BI for the Enterprise presentation by Hector Villafuerte at the Power BI Fest – South Florida 2019.

This talk provides attendees with insights on important aspects of implementing Power BI Service at organizations of all sizes. It empowers business users with the knowledge to establish a symbiotic and productive relationship with IT departments. This partnership makes it possible to effectively run an efficient data driven organization and departments; meanwhile, being compliant with data governance, security and other requirements.

– The presentation covers business and technical aspects on major topics; such as:

  • Data Governance (IT and Business perspectives)
  • Security
  • Version/Source control
  • Deployment
  • Data Pipelines

In a time where data privacy and breaches are a major concern, this session outlines important practices to business and technical users; making it a must see session.

Event Date: November 16, 2019 8:00 am – 6:00 pm

Address:
Nova Southeastern University
Main Campus – Davie
3301 College Avenue
Davie, FL 33314

Categories
AWS Azure C#

Building Scalable Serverless Apps in the cloud using Amazon Web Services (AWS) and Microsoft Azure

Building Scalable Serverless Apps in the cloud using Amazon Web Services (AWS) and Microsoft Azure presentation by Hector Villafuerte at the South Florida Code Camp 2019

Amazon Web Services (AWS) and Microsoft Azure are the cloud market leaders. Many organizations use both platforms together for maximum capability and flexibility, and having skills in both areas is becoming more and more essential for developers. In this session Hector covers a broad range of serverless products and services available in the Azure and AWS platform, showing the similarities and differences between Azure and AWS. Hector will demostrate using a live demo how to build, deploy, debug and monitor a serverless app in Azure and AWS cloud platforms. 

Event Date: March 2, 2019 7:30 am – 5:45 pm

ADDRESS:
Nova Southeastern University
Main Campus – Davie
3301 College Avenue
Davie, FL 33314

Categories
No SQL Power BI

PowerBI for Large and Diverse databases 2019

PowerBI for Large and Diverse databases by Hector Villafuerte at the South Florida Code Camp 2019

Today’s enterprise business analytics requires run complex analytic queries against large datasets stored in different sources like Azure SQL Database, Azure Analysis Services, DynamoDB, MongoDB and others. In this session, BI Architect and Microsoft Certified Professional, Hector Villafuerte focuses upon the design, architecture and best practices that allows Power BI to offer the best functionality and performance combination. Throughout the session, we explore live demos of various large and diverse datasets and take advantage of Power BI latest features to achieve high performance and visual capabilities.

Event Date: March 2, 2019 7:30 am – 5:45 pm

ADDRESS:
Nova Southeastern University
Main Campus – Davie
3301 College Avenue
Davie, FL 33314

Categories
Datawarehouse Power BI SSAS

“Power BI for Large Databases with Composite Mode” at South Florida Power BI User Group

Power BI for Large Databases with new Composite Mode presentation by Hector Villafuerte at the South Florida Power BI User Group.

Today’s enterprise business analytics requires run complex analytic queries against large datasets stored in different sources like Azure SQL Database, Azure Analysis Services, Azure SQL Data Warehouse, Apache Hive, Apache Spark. In this session, BI Architect and Microsoft Certified Professional, Hector Villafuerte focuses upon the design, architecture and best practices that allows Power BI to offer the best functionality and performance combination. Throughout the session, we explore various large datasets and witness how to implement Power BI and different data technologies to achieve high performance and visual capabilities.

DATE: Thursday – October 4th, 2018
TIME: 6:00 pm

– ADDRESS:
Nova Southeastern University
Main Campus – Davie
3301 College Avenue
Davie, FL 33314

Categories
Datawarehouse Power BI SSAS Uncategorized

My presentation for SQLSATURDAY 755 South Florida Conference

This is the presentation for my session at SQL Saturday, South Florida, June 9 2018

Link to download PPT: Download Presentation

Categories
Alexa AWS Azure C# No SQL

Building Scalable Serverless Apps in the Cloud with .NET: Amazon AWS or Microsoft Azure ?

Here are the slides of my presentation at South Florida Code Camp 2018 on February 10th, 2018.

Recently released toolsets for AWS Lambda and Azure Functions are finally making “serverless” application development available to C# developers. Join me to explore the different features and development process of an Alexa Skill with .NET using the most popular serverless cloud technologies in the market: AWS Lambda, Azure Functions, AWS Dynamo DB and Azure CosmosDB. We’ll compare the development experience and features of Amazon AWS and Microsoft Azure Cloud Platforms.

Scalable Serverless Apps

Categories
AWS Azure C#

Alexa Skill with Azure Functions

After developing some skills using AWS Lambda, C# and the AWS Toolkit for Visual Studio. I encounter some advantages and disadvantages in the development Tools for the skills I’d like to develop . This post shows the steps to develop an Alexa Skill using Azure Functions.

Alexa with Azure Functions

Microsoft’s  Serverless Computing equivalent to AWS Lambda are Azure Functions, which support .Net Framework up to 4.7. This allow us to leverage some .NET technologies, third-party .NET libraries and some NuGet not available with .NET Core with the availability of and consumption of other services within Azure ecosystem.

Alexa Skills + Azure Functions

In this post I will show how to create simple skill and how to handle the skill requests using Azure Functions. Using Azure Functions to handle the skill request allow us to use Function-as-a-Service (FaaS) easily integrated with Platform-as-a-Service (PaaS) in Azure like SQL Azure or Document DB.
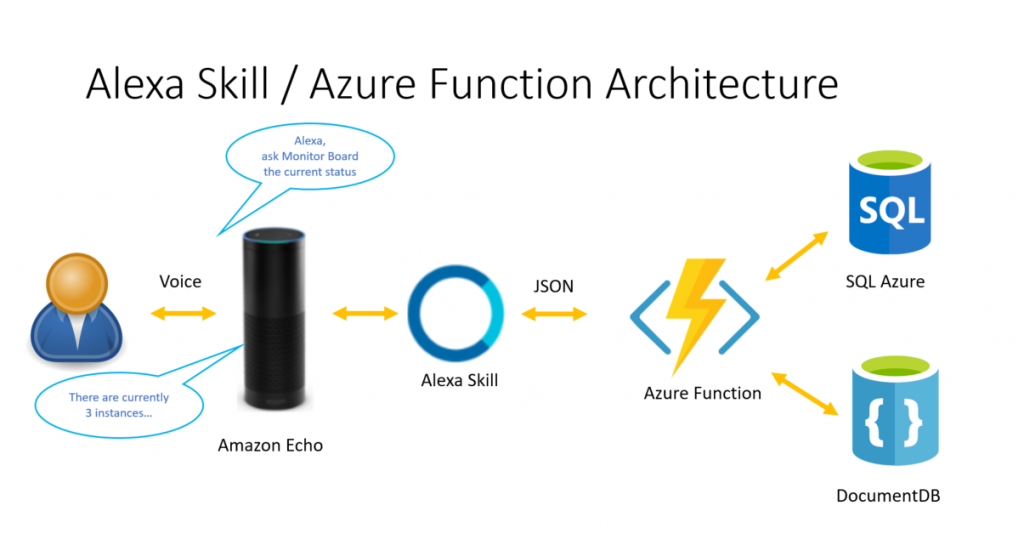
Develop an Alexa skill using Azure Functions

I’ll show a simple skill will allow to add two numbers by saying to Alexa: add three plus seven.

The main goal is to use Alexa Skill and Azure Functions to implement this simple skill.

I used Visual Studio 2017 version 15.4.4 to develop this sample. Visual Studio 2017 Tools for Azure Functions are now available as part of the Azure development workload starting in the Visual Studio 2017 15.3 release. Do not use Visual Studio 2015, since there is no plans to update the Azure Functions Preview.

Creating the Azure Function project

First, create a new project in VS, using the Azure Function template. Go to File -> New Project and then select the “Cloud” node under the “Visual C#” section and choose the “Azure Functions” project type.

Type: FunctionApp under Name Box.

The new created project contains these files:

These files are pretty much empty.

  • host.json: Lets you configure the Functions host. These settings apply both when running locally and in Azure.
  • local.settings.json: Maintains settings used when running functions locally. These settings are not used by Azure. Use this file to specify settings, such as connection strings to other Azure services.
  • Add a Function to your project

We’ll add a function to the project, by right clicking on the project in Solution Explorer, choose “Add” and then “New Azure Function”

In the Azure Function dialog, create a new function. Give it a name: AddFunction and then click Add.

Select HTTPTrigger – C# function, set its Access rights to Anonymous, and click OK.

Copy the following code to the AddFunction.cs file.

using Microsoft.Azure.WebJobs;
using Microsoft.Azure.WebJobs.Extensions.Http;
using Microsoft.Azure.WebJobs.Host;
using System;
using System.Net;
using System.Net.Http;
using System.Threading.Tasks;

namespace FunctionApp
{
    public static class AddFunction
    {
        [FunctionName("AddFunction")]
        public static async Task<HttpResponseMessage> Run([HttpTrigger(AuthorizationLevel.Anonymous, "get", "post", Route = null)]HttpRequestMessage req, TraceWriter log)
        {

            // Simple Function

            // Get request body
            dynamic data = await req.Content.ReadAsAsync<object>();

            log.Info($"Content={data}");


            if (data.request.type == "LaunchRequest")
            {
                // default launch request, let's just let them know what you can do
                log.Info($"Default LaunchRequest made");

                return DefaultRequest(req);

            }
            else if (data.request.type == "IntentRequest")
            {
                // Set name to query string or body data
                string intentName = data.request.intent.name;
                log.Info($"intentName={intentName}");

                switch (intentName)
                {
                    case "AddIntent":

                        var n1 = Convert.ToDouble(data.request.intent.slots["firstnum"].value);
                        var n2 = Convert.ToDouble(data.request.intent.slots["secondnum"].value);

                        double result = n1 + n2;
                        string subject = result.ToString();

                        return req.CreateResponse(HttpStatusCode.OK, new
                        {
                            version = "1.0",
                            sessionAttributes = new { },
                            response = new
                            {
                                outputSpeech = new
                                {
                                    type = "PlainText",
                                    text = $"The result is {result.ToString()}."
                                },
                                card = new
                                {
                                    type = "Simple",
                                    title = "Alexa-Azure Simple Calculator",
                                    content = $"The result is {result.ToString()}."
                                },
                                shouldEndSession = true
                            }
                        });
                    // Add more intents and default responses
                    default:
                        return DefaultRequest(req);
                }

            }
            else
            {
                return DefaultRequest(req);
            }
        }

        private static HttpResponseMessage DefaultRequest(HttpRequestMessage req)
        {
            return req.CreateResponse(HttpStatusCode.OK, new
            {
                version = "1.0",
                sessionAttributes = new { },
                response = new
                {
                    outputSpeech = new
                    {
                        type = "PlainText",
                        text = "Welcome to this calculator that only knows how to add two numbers.\n Ask add two plus three"
                    },
                    card = new
                    {
                        type = "Simple",
                        title = "Alexa-Azure Simple Calculator",
                        content = "Welcome to this calculator that only adds two number.\n Ask 2 + 3"
                    },
                    shouldEndSession = true
                }
            });
        }
    }
}


Run locally and testing

You can test locally your function. When you run the project, copy the URL indicated in the screen below.

Test with Postman

Download Postman to your local computer to test your function.

https://www.getpostman.com/

Add the local function URL and set the following Headers:

Key Value
Content-Type application/json
Cache-Control no-cache

Copy the following code to the Body-Raw Box:

{
  "session": {
    "new": true,
    "sessionId": "SessionId.9d9151ea-0794-44ca-a955-fdefcf4ab2fa",
    "application": {
      "applicationId": "amzn1.ask.skill.<Your ID>"
    },
    "attributes": {},
    "user": {
      "userId": "amzn1.ask.account.<User ID>"
    }
  },
  "request": {
    "type": "LaunchRequest",
    "requestId": "EdwRequestId.32564f90-eddd-417a-a6fb-ed8d0a13d17b",
    "locale": "en-US",
    "timestamp": "2017-11-26T17:10:17Z"
  },
  "context": {
    "AudioPlayer": {
      "playerActivity": "IDLE"
    },
    "System": {
      "application": {
        "applicationId": "amzn1.ask. .<Your ID>"
      },
      "user": {
        "userId": "amzn1.ask.account. .<User ID>"
      },
      "device": {
        "supportedInterfaces": {}
      }
    }
  },
  "version": "1.0"
}


Ensure that Visual Studio is running your function project and set a breakpoint in the Run method in the AddFunction class. Send the request in Postman and this Launch the Skill.

The following JSON is using the Add Intent with two numbers. Copy this to the Raw box in Postman and send the request.

{
  "session": {
    "new": false,
    "sessionId": "SessionId.9d9151ea-0794-44ca-a955-fdefcf4ab2fa",
    "application": {
      "applicationId": "amzn1.ask.skill.<App Id>"
    },
    "attributes": {},
    "user": {
      "userId": "amzn1.ask.account.<User Id>"
    }
  },
  "request": {
    "type": "IntentRequest",
    "requestId": "EdwRequestId.22215e1e-ea06-452f-88ba-7ffad48ad9ce",
    "intent": {
      "name": "AddIntent",
      "slots": {
        "secondnum": {
          "name": "secondnum",
          "value": "7"
        },
        "firstnum": {
          "name": "firstnum",
          "value": "6"
        }
      }
    },
    "locale": "en-US",
    "timestamp": "2017-11-26T19:07:16Z"
  },
  "context": {
    "AudioPlayer": {
      "playerActivity": "IDLE"
    },
    "System": {
      "application": {
        "applicationId": "amzn1.ask.skill.<App Id>"
      },
      "user": {
        "userId": "amzn1.ask.account.<User Id>"
      },
      "device": {
        "supportedInterfaces": {}
      }
    }
  },
  "version": "1.0"
}


The result will be displayed in Postman.

Publish to Azure

Now the function was tested locally, we procced to publish it to Azure. Right click the project in the Solution explorer and select the menu publish. Then select “Azure Function App” and “Create New” and click Publish button.

Enter a unique name in “App Name”, I chose FunctionApp2017 is a unique name for Azure and Click Create.

Once your project is published, you’ll get the screen below including the Site URL.

Click the Site URL. Once the Azure Function is running, I can test again in Postman using the Site URL.

Create a New Alexa Skill

The second part is to create the Alexa Skill and integrate this with the Azure function. Open the AWS Developer Console.

https://developer.amazon.com

Click “Get Started” and then “Add a New Skill”

Click “Add New Skill” button.

Add a Name and Invocation Name to your Skill.

Once you save this the Application Id will be generated.

Click Next to switch to the Configuration step and enter the following JSon text to the “Intent Schema” Box:

{
  "intents": [
    {
      "slots": [
        {
          "name": "firstnum",
          "type": "AMAZON.NUMBER"
        },
        {
          "name": "secondnum",
          "type": "AMAZON.NUMBER"
        }
      ],
      "intent": "AddIntent"
    }
  ]
}

Add the following to the Sample Utterances:

AddIntent what is {firstnum} plus {secondnum}

AddIntent add {firstnum} and {secondnum}

AddIntent tell me the answer to {firstnum} and {secondnum}


Click Next. In the Configuration Section check HTTPS for the Endpoint as Amazon requires to use a valid, trusted certificate, which Azure functions provides, and add the Azure Site URL: https://functionapp2017.azurewebsites.net/api/AddFunction to the Default Endpoint URL.

Next in the “Service Simulator” you can test the launch intent using the invocation name assigned to your skill:

Alexa start my math

Then test the Add Intent using the Utterance:

Add six plus seven

Next you can enter the Global Fields information.

Next enter the Privacy and Compliance information.

Conclusion

Azure Function like AWS Lambda lets you run code without provisioning or managing servers. You pay only for the compute time you consume – there is no charge when your code is not running.

Having Alexa and Azure Function is a powerful combination, since Azure Function has full .NET Framework capabilities. Meanwhile AWS Lambda only supports .NET Core.

In a future Post, I’ll show how you can add the AlexaSkillsKit.NET, which is a library based on the same object model as Amazon’s AlexaSkillsKit for Java.

 

Categories
Power BI

.NET App Security (MVC, Web Forms, Web API) with SQL 2016 RLS

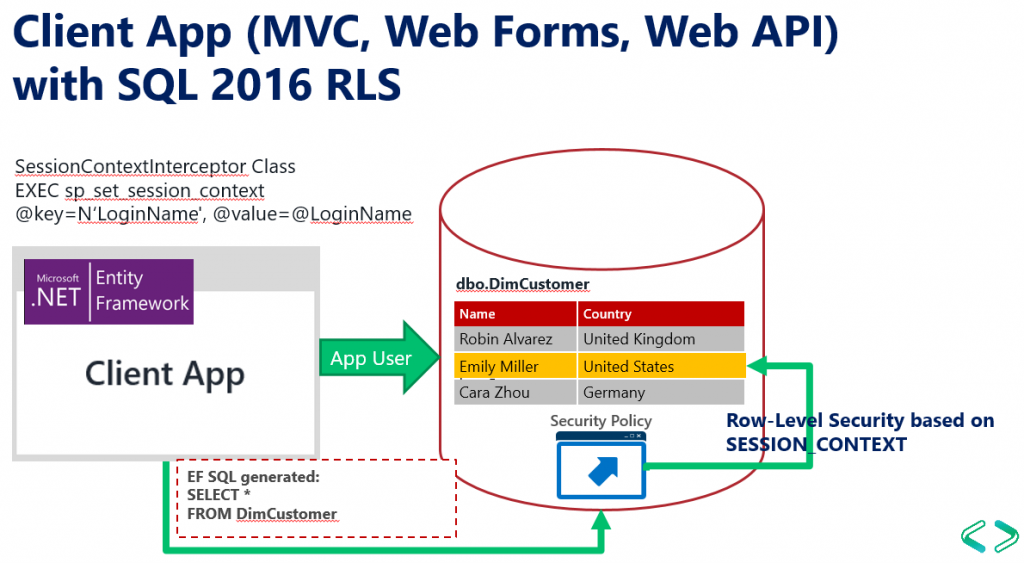
In this article, I’ll show the implementation of Row-Level-Security (RLS) with SQL 2016 and any .NET application like Web MVC, Web Forms, Web API, Windows App, etc. In previous articles, I showed you how to implement RLS in SQL 2016 and how client tools like Excel or Power BI can take advantage of this security. Now we’ll focus in .NET applications. Traditionally, we use to implement the security for data by coding the necessary logic using C# or VB.NET in the middle tier application.

Now, SQL 2016 allows the implementation of RLS, the security logic can be implemented right in the database, reducing the security code in the .NET middle tier app and centralizing the security in the source database, so any application or third party tool can connect to the database and reuse the same RLS security.

The following sample shows how to implement RLS in SQL to allow any .NET application with or without Active Directory or using another Security Membership Framework to query a SQL Server 2016 database and use RLS.

In order to do this, the .NET application should set values in the SESSION_CONTEXT after connecting to the database, and then security policies in the database will be able to read the values from SESSION_CONTEXT and filter rows using the Context values.

This article uses the same database I use in other articles.

In Visual Studio, Create Wasp – ASP .NET Project – Check ASP Forms and MVC. You can implement this in any .NET Windows or Web application: Console App, MVC, Web API, etc. For simplicity we’ll use Web Forms, but you might also implement this using Web API and use Angular for your web app.

Select MVC Template, Windows Authentication.

Add new item to the project: ADO.NET Entity Data Model, to the sample database. This will create a reference to Entity Framework. Call the model AdventureWorksModel.

Build the connection to the database.

For this sample, we’ll chose the tables DimCustomer and DimGeography.

You’ll get this model.

Create a Web Form called: TopCustomers.aspx. Add a RadGrid and ScriptManager Control to the Form. Add this code to code behind file TopCustomers.aspx.cs:

I add a Telerik Radgrid (You can add any control you want to display a list of customers) and the script manager.

using System;

using System.Collections.Generic;

using System.Linq;

using System.Web;

using System.Web.UI;

using System.Web.UI.WebControls;

namespace WebAppWithRLS

{

public partial class TopCustomers : System.Web.UI.Page

{

protected void Page_Load(object sender, EventArgs e)

{

AdventureWorksDW2014Entities db = new AdventureWorksDW2014Entities();

var topCustomers =

from customer in db.DimCustomers

join geography in db.DimGeographies on customer.GeographyKey equals geography.GeographyKey

select new { Name = customer.FirstName + " " + customer.LastName, geography.EnglishCountryRegionName };

RadGrid1.DataSource = topCustomers.ToList().Take(100);

RadGrid1.DataBind();

}

}

Set the TopCustomers.aspx page as “Start Page”

Run the application in Visual Studio.

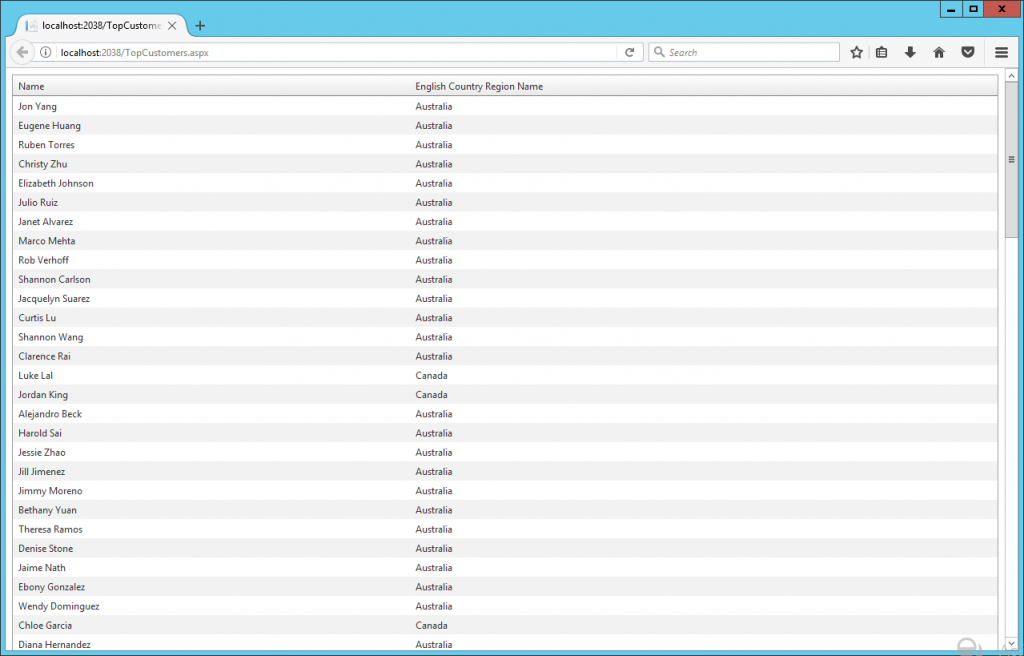
The page shows records from Australia and Canada. Even though the user gwilliams belongs to the Active Directory group “AW United Kingdom” so it should retrieve customer records from England only.

The user gwilliams is logged to the ASP .NET application, even though the Web App becomes a middle tier application that connects to the database using another middle tier user. In visual studio is the user account executing running visual studio and in IIS is the AppPool configured user.

The way to resolve go around this scenario is to send the context values in our context session before executing the SQL query or command, so SQL 2016 RLS can read this values and apply the corresponding security.

using System;

using System.Collections.Generic;

using System.Linq;

using System.Web;

using System.Data.Common;

using System.Data.Entity;

using System.Data.Entity.Infrastructure.Interception;

namespace WebAppWithRLS.Models

{

 public class SessionContextInterceptor: IDbConnectionInterceptor

 {

  public void Opened(DbConnection connection, DbConnectionInterceptionContext interceptionContext)

  {

   // Set SESSION_CONTEXT to current UserId whenever EF opens a connection

   try

   {

    var loginName = System.Web.HttpContext.Current.User.Identity.Name;

    if (loginName != null)

    {

     DbCommand cmd = connection.CreateCommand();

     cmd.CommandText = "EXEC sp_set_session_context @key=N'LoginName', @value=@LoginName";

     DbParameter param = cmd.CreateParameter();

     param.ParameterName = "@LoginName";

     param.Value = loginName;

     cmd.Parameters.Add(param);

     cmd.ExecuteNonQuery();

    }

   } catch (System.NullReferenceException)

   {

    // If no user is logged in, leave SESSION_CONTEXT null (all rows will be filtered)

   }

  }

  public void Opening(DbConnection connection, DbConnectionInterceptionContext interceptionContext)

  {

  }

  public void BeganTransaction(DbConnection connection, BeginTransactionInterceptionContext interceptionContext)

  {

  }

  public void BeginningTransaction(DbConnection connection, BeginTransactionInterceptionContext interceptionContext)

  {

  }

  public void Closed(DbConnection connection, DbConnectionInterceptionContext interceptionContext)

  {

  }

  public void Closing(DbConnection connection, DbConnectionInterceptionContext interceptionContext)

  {

  }

  public void ConnectionStringGetting(DbConnection connection, DbConnectionInterceptionContext < string > interceptionContext)

  {

  }

  public void ConnectionStringGot(DbConnection connection, DbConnectionInterceptionContext < string > interceptionContext)

  {

  }

  public void ConnectionStringSet(DbConnection connection, DbConnectionPropertyInterceptionContext < string > interceptionContext)

  {

  }

  public void ConnectionStringSetting(DbConnection connection, DbConnectionPropertyInterceptionContext < string > interceptionContext)

  {

  }

  public void ConnectionTimeoutGetting(DbConnection connection, DbConnectionInterceptionContext < int > interceptionContext)

  {

  }

  public void ConnectionTimeoutGot(DbConnection connection, DbConnectionInterceptionContext < int > interceptionContext)

  {

  }

  public void DataSourceGetting(DbConnection connection, DbConnectionInterceptionContext < string > interceptionContext)

  {

  }

  public void DataSourceGot(DbConnection connection, DbConnectionInterceptionContext < string > interceptionContext)

  {

  }

  public void DatabaseGetting(DbConnection connection, DbConnectionInterceptionContext < string > interceptionContext)

  {

  }

  public void DatabaseGot(DbConnection connection, DbConnectionInterceptionContext < string > interceptionContext)

  {

  }

  public void Disposed(DbConnection connection, DbConnectionInterceptionContext interceptionContext)

  {

  }

  public void Disposing(DbConnection connection, DbConnectionInterceptionContext interceptionContext)

  {

  }

  public void EnlistedTransaction(DbConnection connection, EnlistTransactionInterceptionContext interceptionContext)

  {

  }

  public void EnlistingTransaction(DbConnection connection, EnlistTransactionInterceptionContext interceptionContext)

  {

  }

  public void ServerVersionGetting(DbConnection connection, DbConnectionInterceptionContext < string > interceptionContext)

  {

  }

  public void ServerVersionGot(DbConnection connection, DbConnectionInterceptionContext < string > interceptionContext)

  {

  }

  public void StateGetting(DbConnection connection, DbConnectionInterceptionContext < System.Data.ConnectionState > interceptionContext)

  {

  }

  public void StateGot(DbConnection connection, DbConnectionInterceptionContext < System.Data.ConnectionState > interceptionContext)

  {

  }

 }

 public class SessionContextConfiguration: DbConfiguration

 {

  public SessionContextConfiguration()

  {

   AddInterceptor(new SessionContextInterceptor());

  }

 }

}

Create the class SessionContextInterceptor.cs and add the following code:


The class SessionContextInterceptor as the name suggest will intercept a SQL command from EF model and execute the code in the Opened method. Using sp_set_session_context we set the value of @LoginName variable. This variable will be alive and accessible form SQL Server only for that session.

Now, let’s implement the RLS in SQL. We create the predicate function which reads the context values using SESSION_CONTEXT(N’LoginName’).

USE [AdventureWorksDW2014]

GO

CREATE FUNCTION RLS.GeographyAccessPredicate(@GeographyKey AS INT)

RETURNS TABLE

WITH SCHEMABINDING

AS

RETURN SELECT 1 AS AccessResult

FROM dbo.DimGeography G

INNER JOIN dbo.DimActiveDirectoryUser U

ON G.GeographyKey = @GeographyKey AND

(

(

U.LoginName = CAST(SESSION_CONTEXT(N'LoginName') AS nvarchar(150))

OR

U.LoginName = REPLACE(SUSER_NAME(), 'DOMAIN\', '')

)

AND

G.EnglishCountryRegionName = REPLACE(U.GroupName,'AW ','')

)

GO

CREATE SECURITY POLICY RLS.AWSecurityPolicy

ADD FILTER PREDICATE RLS.GeographyAccessPredicate(GeographyKey) ON dbo.DimCustomer


After that we run he program and now we can see only customers from United Kingdom, so the records are filtered by using the user name gwilliams.

In this article, I showed how RLS can be implemented regardless of the type of authentication (Database Custom Membership, Windows, Forms, OWIN, etc.) in our .NET application and type of .NET application: Console App, Window App, Web API, ASP .NET MVC/Web Forms, etc.

Bitnami