After developing some skills using AWS Lambda, C# and the AWS Toolkit for Visual Studio. I encounter some advantages and disadvantages in the development Tools for the skills I’d like to develop . This post shows the steps to develop an Alexa Skill using Azure Functions.
Alexa with Azure Functions
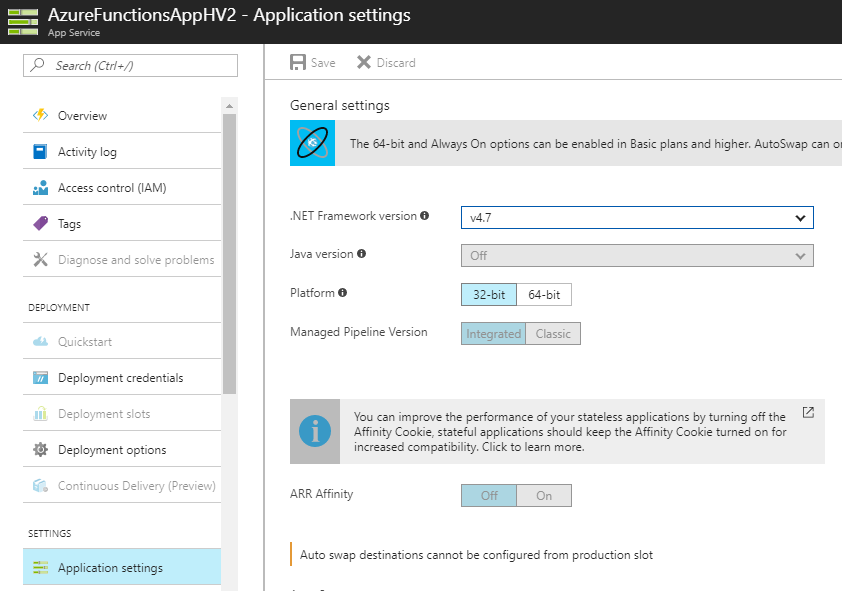
Microsoft’s Serverless Computing equivalent to AWS Lambda are Azure Functions, which support .Net Framework up to 4.7. This allow us to leverage some .NET technologies, third-party .NET libraries and some NuGet not available with .NET Core with the availability of and consumption of other services within Azure ecosystem.
Alexa Skills + Azure Functions
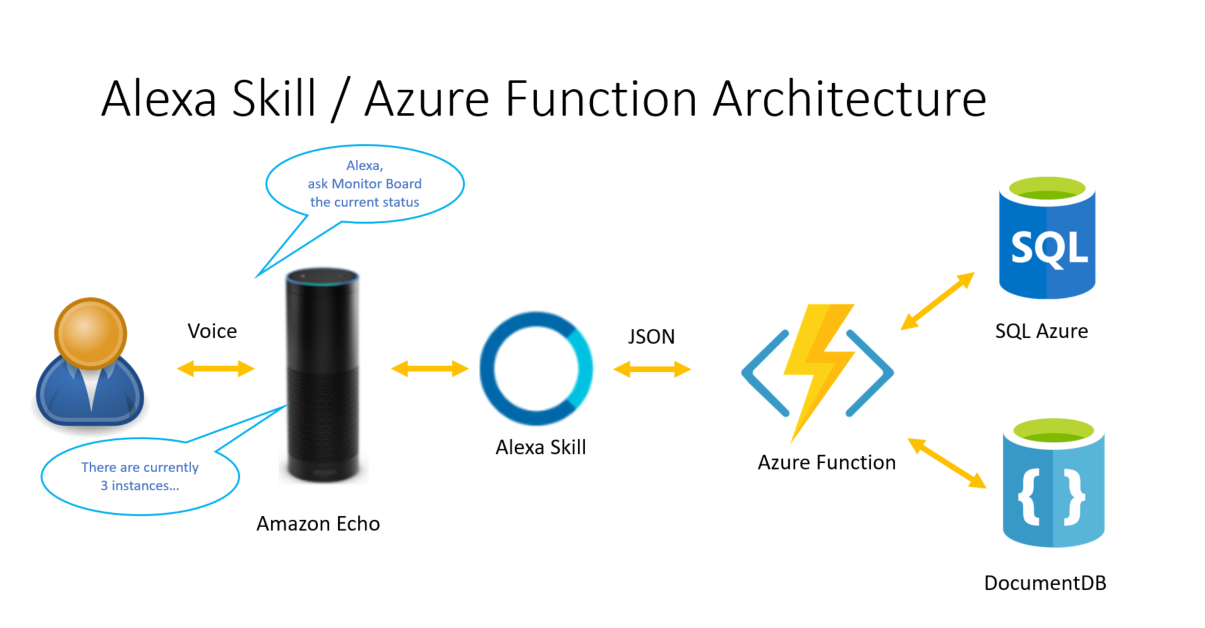
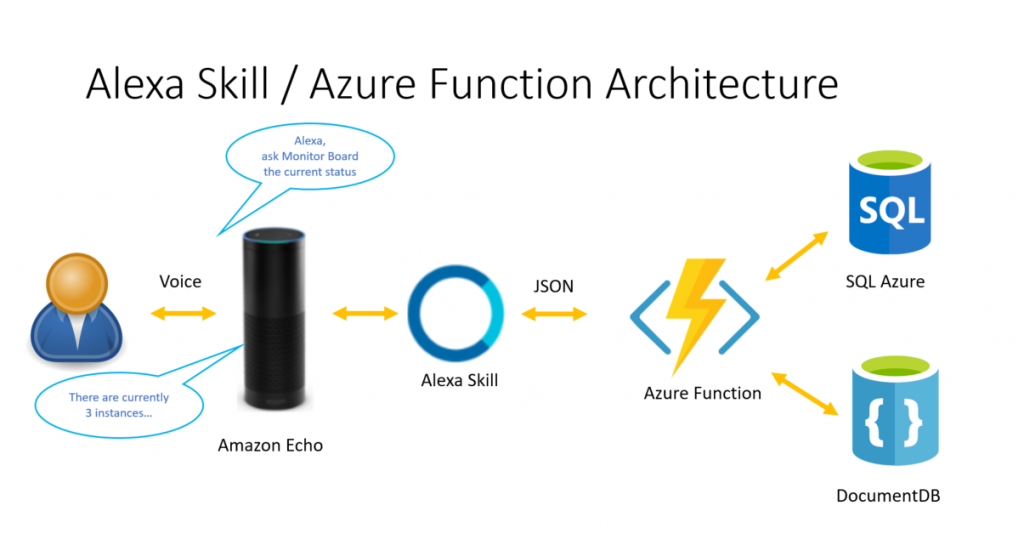
In this post I will show how to create simple skill and how to handle the skill requests using Azure Functions. Using Azure Functions to handle the skill request allow us to use Function-as-a-Service (FaaS) easily integrated with Platform-as-a-Service (PaaS) in Azure like SQL Azure or Document DB.
Develop an Alexa skill using Azure Functions
I’ll show a simple skill will allow to add two numbers by saying to Alexa: add three plus seven.
The main goal is to use Alexa Skill and Azure Functions to implement this simple skill.
I used Visual Studio 2017 version 15.4.4 to develop this sample. Visual Studio 2017 Tools for Azure Functions are now available as part of the Azure development workload starting in the Visual Studio 2017 15.3 release. Do not use Visual Studio 2015, since there is no plans to update the Azure Functions Preview.
Creating the Azure Function project
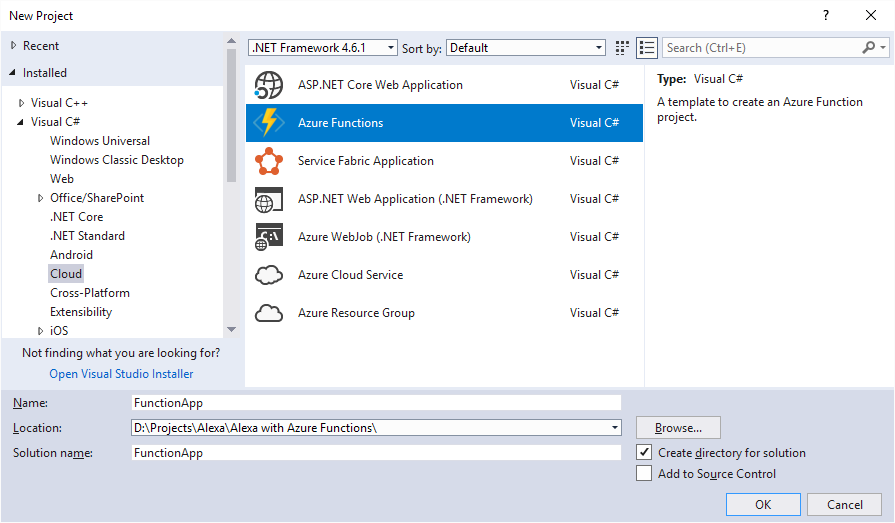
First, create a new project in VS, using the Azure Function template. Go to File -> New Project and then select the “Cloud” node under the “Visual C#” section and choose the “Azure Functions” project type.
Type: FunctionApp under Name Box.
The new created project contains these files:
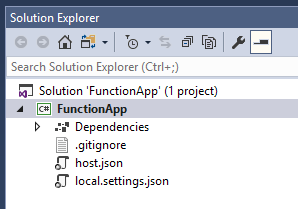
These files are pretty much empty.
- host.json: Lets you configure the Functions host. These settings apply both when running locally and in Azure.
- local.settings.json: Maintains settings used when running functions locally. These settings are not used by Azure. Use this file to specify settings, such as connection strings to other Azure services.
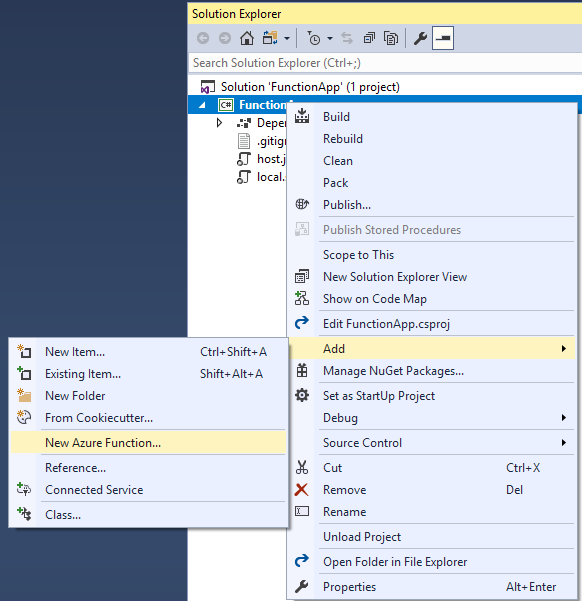
- Add a Function to your project
We’ll add a function to the project, by right clicking on the project in Solution Explorer, choose “Add” and then “New Azure Function”
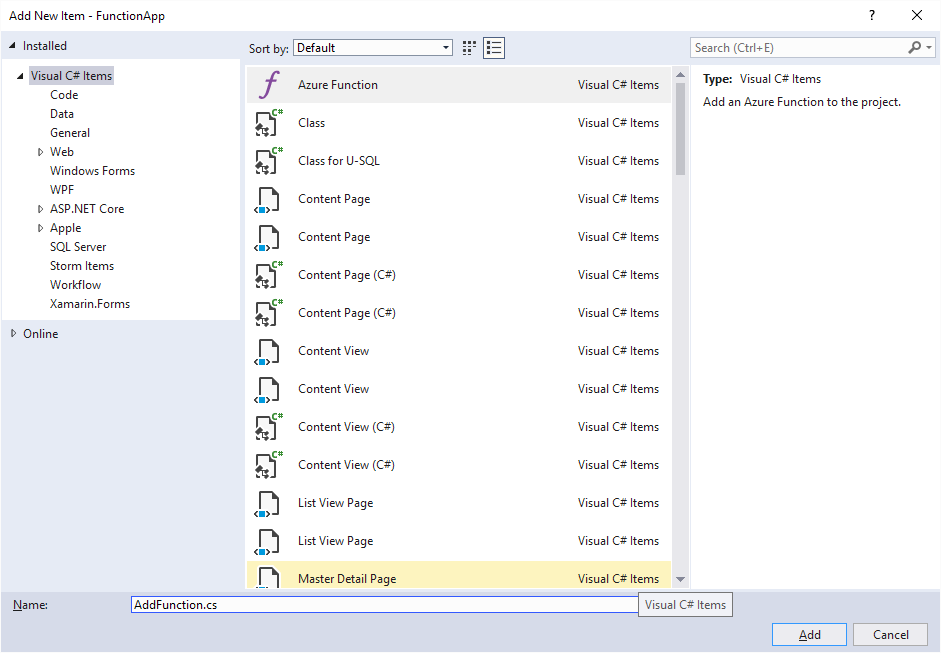
In the Azure Function dialog, create a new function. Give it a name: AddFunction and then click Add.
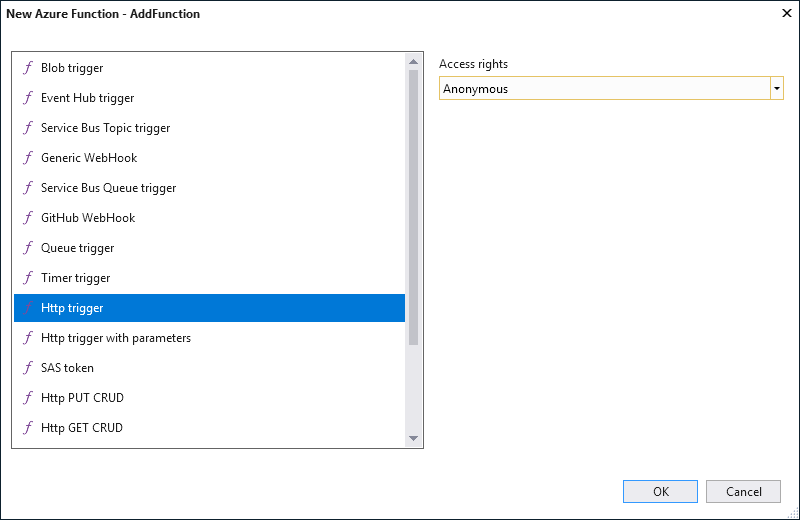
Select HTTPTrigger – C# function, set its Access rights to Anonymous, and click OK.
Copy the following code to the AddFunction.cs file.
using Microsoft.Azure.WebJobs;
using Microsoft.Azure.WebJobs.Extensions.Http;
using Microsoft.Azure.WebJobs.Host;
using System;
using System.Net;
using System.Net.Http;
using System.Threading.Tasks;

namespace FunctionApp
{
    public static class AddFunction
    {
        [FunctionName("AddFunction")]
        public static async Task<HttpResponseMessage> Run([HttpTrigger(AuthorizationLevel.Anonymous, "get", "post", Route = null)]HttpRequestMessage req, TraceWriter log)
        {

            // Simple Function

            // Get request body
            dynamic data = await req.Content.ReadAsAsync<object>();

            log.Info($"Content={data}");


            if (data.request.type == "LaunchRequest")
            {
                // default launch request, let's just let them know what you can do
                log.Info($"Default LaunchRequest made");

                return DefaultRequest(req);

            }
            else if (data.request.type == "IntentRequest")
            {
                // Set name to query string or body data
                string intentName = data.request.intent.name;
                log.Info($"intentName={intentName}");

                switch (intentName)
                {
                    case "AddIntent":

                        var n1 = Convert.ToDouble(data.request.intent.slots["firstnum"].value);
                        var n2 = Convert.ToDouble(data.request.intent.slots["secondnum"].value);

                        double result = n1 + n2;
                        string subject = result.ToString();

                        return req.CreateResponse(HttpStatusCode.OK, new
                        {
                            version = "1.0",
                            sessionAttributes = new { },
                            response = new
                            {
                                outputSpeech = new
                                {
                                    type = "PlainText",
                                    text = $"The result is {result.ToString()}."
                                },
                                card = new
                                {
                                    type = "Simple",
                                    title = "Alexa-Azure Simple Calculator",
                                    content = $"The result is {result.ToString()}."
                                },
                                shouldEndSession = true
                            }
                        });
                    // Add more intents and default responses
                    default:
                        return DefaultRequest(req);
                }

            }
            else
            {
                return DefaultRequest(req);
            }
        }

        private static HttpResponseMessage DefaultRequest(HttpRequestMessage req)
        {
            return req.CreateResponse(HttpStatusCode.OK, new
            {
                version = "1.0",
                sessionAttributes = new { },
                response = new
                {
                    outputSpeech = new
                    {
                        type = "PlainText",
                        text = "Welcome to this calculator that only knows how to add two numbers.\n Ask add two plus three"
                    },
                    card = new
                    {
                        type = "Simple",
                        title = "Alexa-Azure Simple Calculator",
                        content = "Welcome to this calculator that only adds two number.\n Ask 2 + 3"
                    },
                    shouldEndSession = true
                }
            });
        }
    }
}
Run locally and testing
You can test locally your function. When you run the project, copy the URL indicated in the screen below.

Test with Postman
Download Postman to your local computer to test your function.
https://www.getpostman.com/
Add the local function URL and set the following Headers:
| Key |
Value |
| Content-Type |
application/json |
| Cache-Control |
no-cache |

Copy the following code to the Body-Raw Box:
{
  "session": {
    "new": true,
    "sessionId": "SessionId.9d9151ea-0794-44ca-a955-fdefcf4ab2fa",
    "application": {
      "applicationId": "amzn1.ask.skill.<Your ID>"
    },
    "attributes": {},
    "user": {
      "userId": "amzn1.ask.account.<User ID>"
    }
  },
  "request": {
    "type": "LaunchRequest",
    "requestId": "EdwRequestId.32564f90-eddd-417a-a6fb-ed8d0a13d17b",
    "locale": "en-US",
    "timestamp": "2017-11-26T17:10:17Z"
  },
  "context": {
    "AudioPlayer": {
      "playerActivity": "IDLE"
    },
    "System": {
      "application": {
        "applicationId": "amzn1.ask. .<Your ID>"
      },
      "user": {
        "userId": "amzn1.ask.account. .<User ID>"
      },
      "device": {
        "supportedInterfaces": {}
      }
    }
  },
  "version": "1.0"
}

Ensure that Visual Studio is running your function project and set a breakpoint in the Run method in the AddFunction class. Send the request in Postman and this Launch the Skill.

The following JSON is using the Add Intent with two numbers. Copy this to the Raw box in Postman and send the request.
{
  "session": {
    "new": false,
    "sessionId": "SessionId.9d9151ea-0794-44ca-a955-fdefcf4ab2fa",
    "application": {
      "applicationId": "amzn1.ask.skill.<App Id>"
    },
    "attributes": {},
    "user": {
      "userId": "amzn1.ask.account.<User Id>"
    }
  },
  "request": {
    "type": "IntentRequest",
    "requestId": "EdwRequestId.22215e1e-ea06-452f-88ba-7ffad48ad9ce",
    "intent": {
      "name": "AddIntent",
      "slots": {
        "secondnum": {
          "name": "secondnum",
          "value": "7"
        },
        "firstnum": {
          "name": "firstnum",
          "value": "6"
        }
      }
    },
    "locale": "en-US",
    "timestamp": "2017-11-26T19:07:16Z"
  },
  "context": {
    "AudioPlayer": {
      "playerActivity": "IDLE"
    },
    "System": {
      "application": {
        "applicationId": "amzn1.ask.skill.<App Id>"
      },
      "user": {
        "userId": "amzn1.ask.account.<User Id>"
      },
      "device": {
        "supportedInterfaces": {}
      }
    }
  },
  "version": "1.0"
}
The result will be displayed in Postman.

Publish to Azure
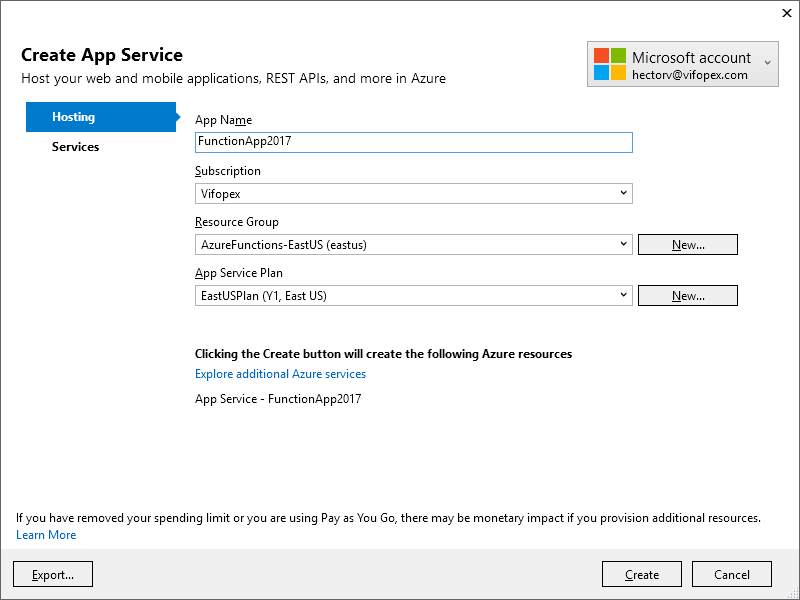
Now the function was tested locally, we procced to publish it to Azure. Right click the project in the Solution explorer and select the menu publish. Then select “Azure Function App” and “Create New” and click Publish button.

Enter a unique name in “App Name”, I chose FunctionApp2017 is a unique name for Azure and Click Create.
Once your project is published, you’ll get the screen below including the Site URL.
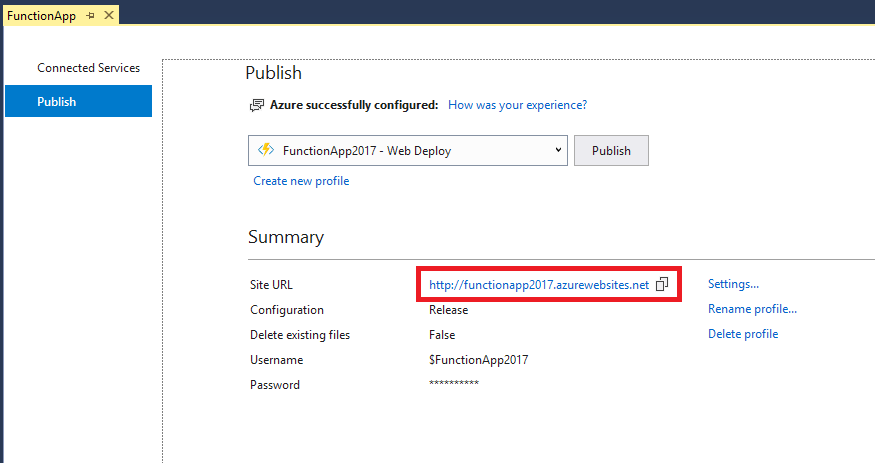
Click the Site URL. Once the Azure Function is running, I can test again in Postman using the Site URL.

Create a New Alexa Skill
The second part is to create the Alexa Skill and integrate this with the Azure function. Open the AWS Developer Console.
https://developer.amazon.com
Click “Get Started” and then “Add a New Skill”

Click “Add New Skill” button.

Add a Name and Invocation Name to your Skill.
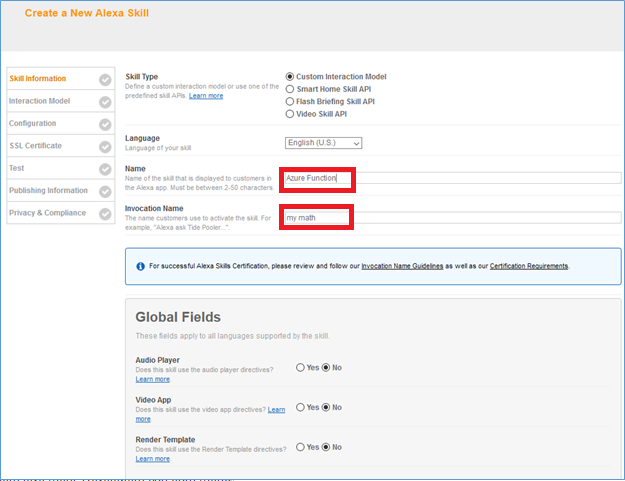
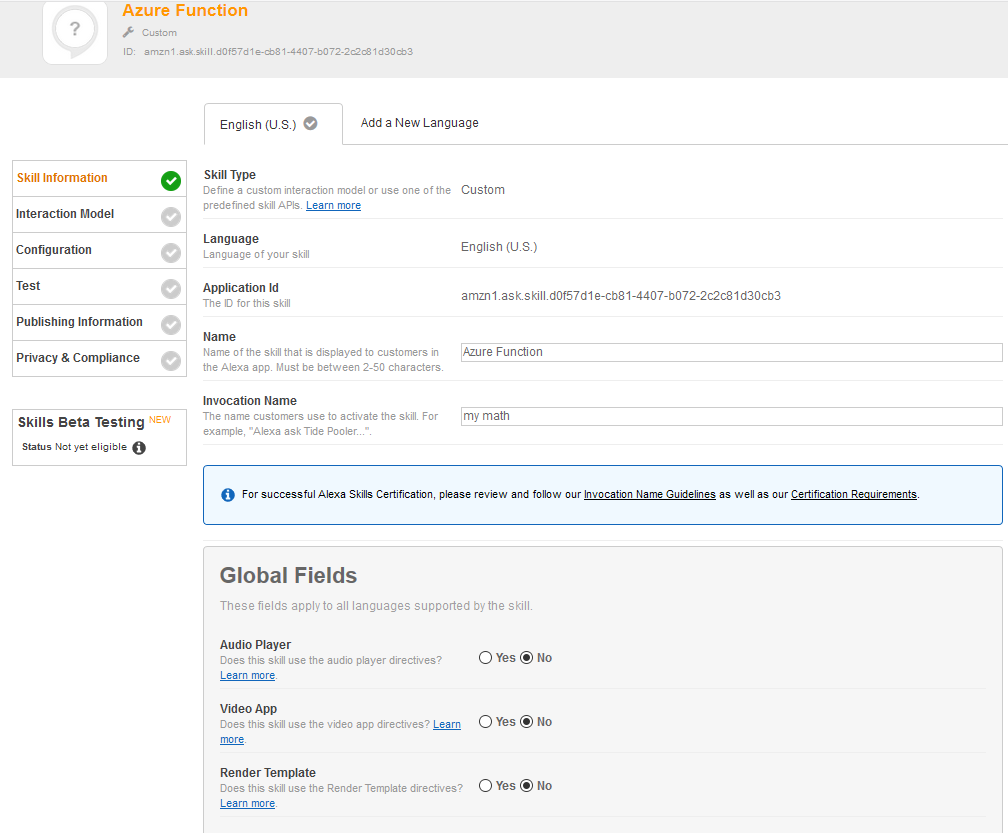
Once you save this the Application Id will be generated.
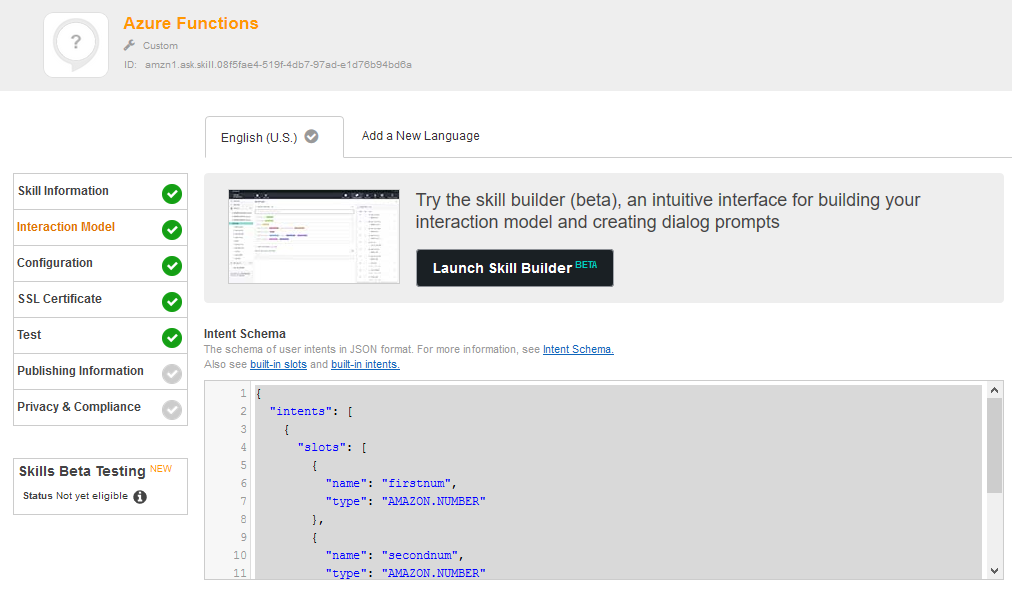
Click Next to switch to the Configuration step and enter the following JSon text to the “Intent Schema” Box:
{
  "intents": [
    {
      "slots": [
        {
          "name": "firstnum",
          "type": "AMAZON.NUMBER"
        },
        {
          "name": "secondnum",
          "type": "AMAZON.NUMBER"
        }
      ],
      "intent": "AddIntent"
    }
  ]
}
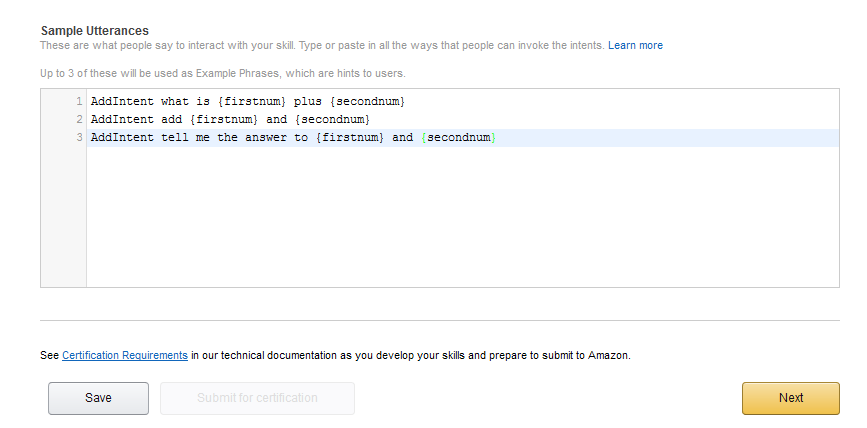
Add the following to the Sample Utterances:
AddIntent what is {firstnum} plus {secondnum}

AddIntent add {firstnum} and {secondnum}

AddIntent tell me the answer to {firstnum} and {secondnum}
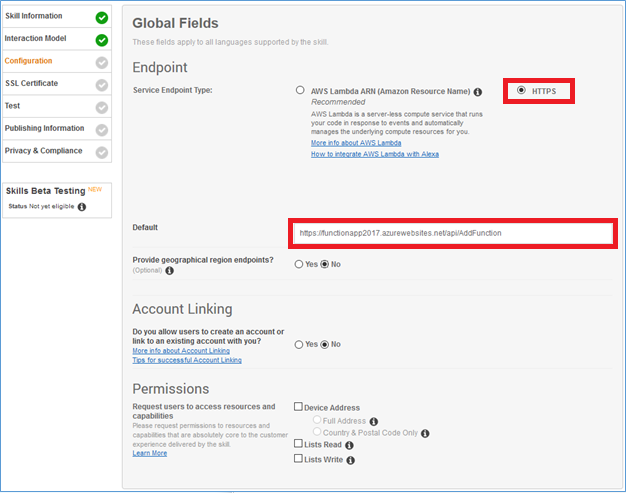
Click Next. In the Configuration Section check HTTPS for the Endpoint as Amazon requires to use a valid, trusted certificate, which Azure functions provides, and add the Azure Site URL: https://functionapp2017.azurewebsites.net/api/AddFunction to the Default Endpoint URL.
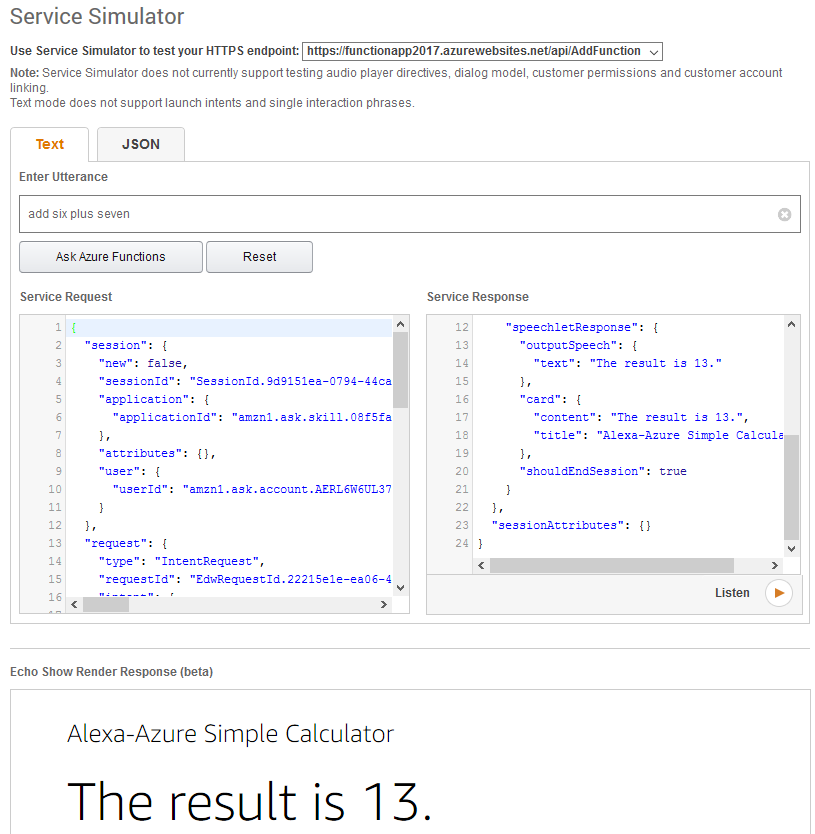
Next in the “Service Simulator” you can test the launch intent using the invocation name assigned to your skill:
Alexa start my math

Then test the Add Intent using the Utterance:
Add six plus seven
Next you can enter the Global Fields information. 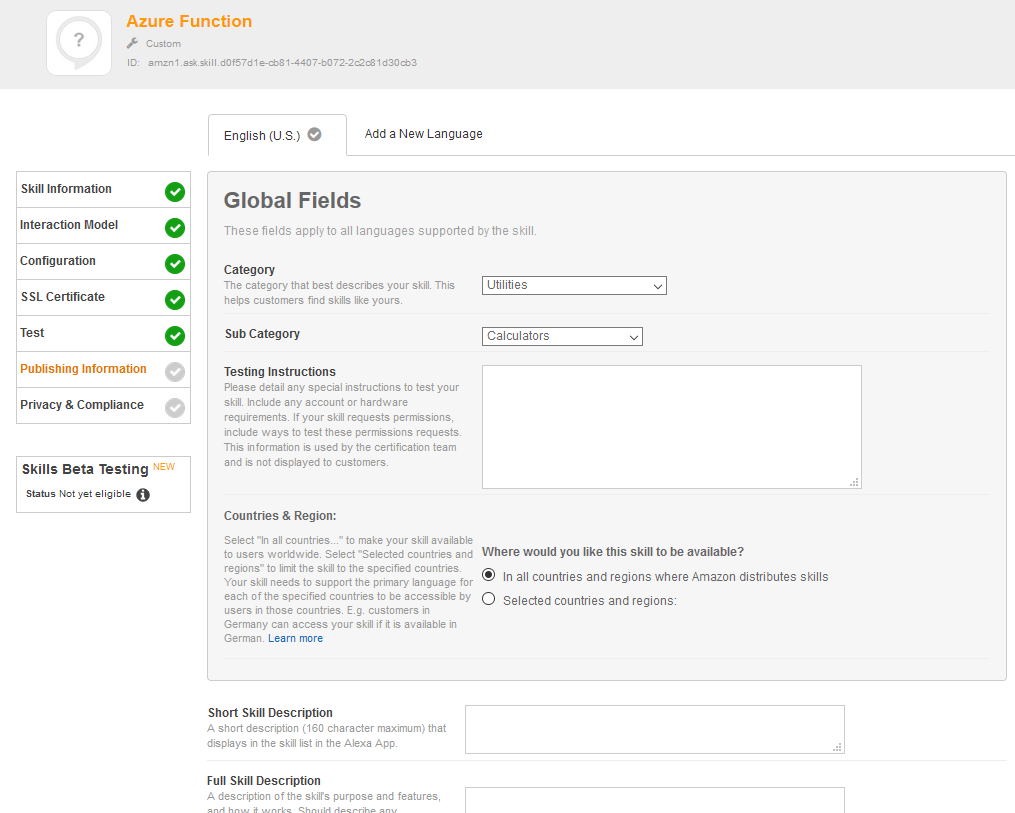
Next enter the Privacy and Compliance information. 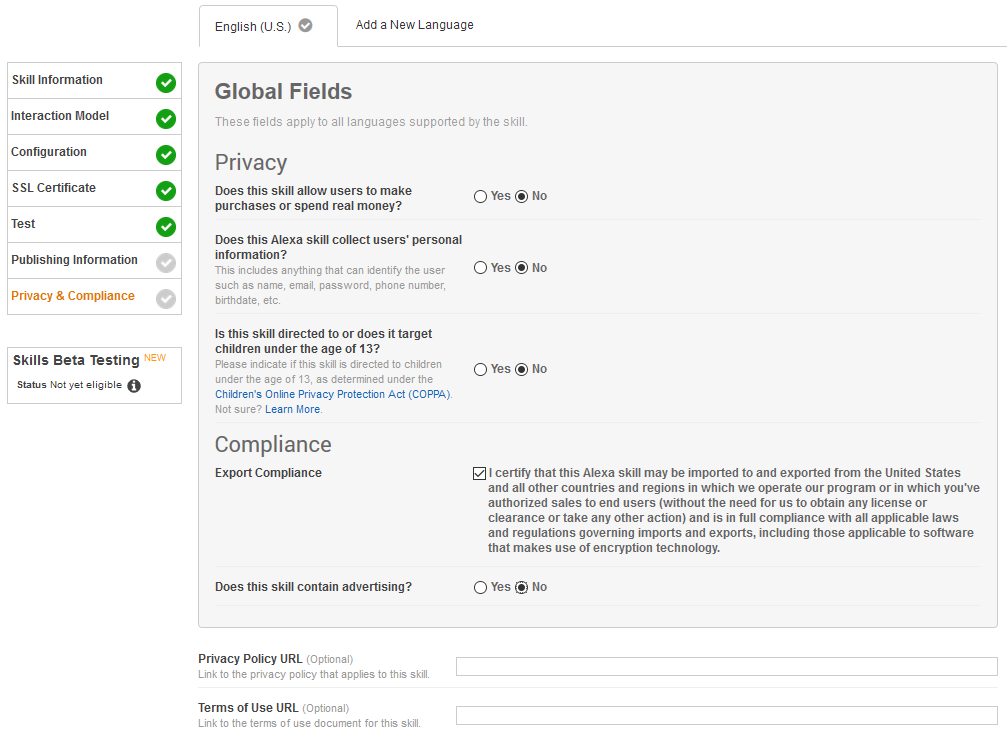
Conclusion
Azure Function like AWS Lambda lets you run code without provisioning or managing servers. You pay only for the compute time you consume – there is no charge when your code is not running.
Having Alexa and Azure Function is a powerful combination, since Azure Function has full .NET Framework capabilities. Meanwhile AWS Lambda only supports .NET Core.
In a future Post, I’ll show how you can add the AlexaSkillsKit.NET, which is a library based on the same object model as Amazon’s AlexaSkillsKit for Java.